| Materials/ Visual Shading Language/ Building an Interface for a VSL Material |
Building an Interface for a VSL MaterialConsider the following situation: You have written a very powerful and nice material using VSL and you want to let other users to play with it. The VSL tree consists of 50 objects doing all kinds of fancy things. By changing certain attributes of certain VSL objects, you can control the appearance of the material. So, how to expose only the 'key attributes' (say irregularity and thickness of wood grains) to the end user and hide the unnecessary complexity from the user? The VSL editor includes tools for solving this problem. It allows you to 'expose' only selected attributes of a VSL material. Other users can adjust the properties of a VSL material without knowing anything about its internal structure. Setting up the interfaceThe 'Attributes' tab in the VSL editor lists all the attributes of the VSL objects that has been inserted to the VSL tree of the currently selected material. The attribute names are the same or similar to the labels of gadgets, which are visible when you edit VSL objects. You can pick the suitable attributes and add them to the tailored interface.
You can rename the exposed attributes using the 'Name' field, in case the default label is not descriptive enough. For example, if you expose the same attribute of two different VSL objects, say 'File name' of a color texture map and 'File name' of a reflection map, renaming is necessary.
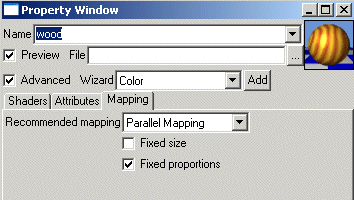
Selecting the preferred mapping method The 'Mapping' tab of 'Advanced' material properties contains settings, which define how the constructed material should be mapped to target objects. It is quite a common situation that a material should be always used together with a particular kind of mapping. A good example is 'wood': real world wood material consists of circles, which are parallel mapped along the axis of a tree. Therefore, only parallel mapping works well with wood. The mapping specifications are used by the drag & drop system. The user can overrule them by selecting another mapping type from the mapping creation tools.
The following controls are available:
If the recommended mapping is set to 'Any Mapping', drag & drop system creates a mapping that best matches the geometry of the target object. Spheres will get a spherical mapping, cylinders gets cylindrical mapping, etc.
|

 |
 |